The Command Bar is where the main AppBarButton Controls can be added, these allow a standard-looking interface for applications to perform certain actions either consistent with similar applications or with custom options.
Step 1
If not already, follow Setup and Start on how to Install and get Started with Visual Studio 2017 or in Windows 10 choose Start, and then from the Start Menu find and select Visual Studio 2017.

Step 2
Once Visual Studio Community 2017 has started, from the Menu choose File, then New then Project…

Step 3
From New Project choose Visual C# from Installed, Templates then choose Blank App (Universal Windows) and then type in a Name and select a Location and then select Ok to create the Project

Step 4
Then in New Universal Windows Project you need to select the Target Version this should be at least the Windows 10 Fall Creators Update (10.0; Build 16299) and the Minimum Version to be the same.

The Target Version will control what features your application can use in Windows 10 so by picking the most recent version you’ll be able to take advantage of those features. To make sure you always have the most recent version, in Visual Studio 2017 select Tools Extensions and Updates… then and then see if there are any Updates
Step 5
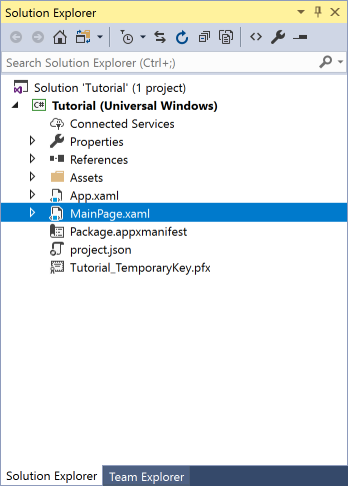
In the Solution Explorer select MainPage.xaml
Step 6
From the Menu choose View and then Designer

Step 7
The Design View will be displayed along with the XAML View and in this between the Grid and /Grid elements, enter the following XAML:
<CommandBar IsOpen="True" IsSticky="True" VerticalAlignment="Bottom">
	<CommandBar.SecondaryCommands>
		<AppBarButton Name="Hide" Icon="Cancel" Label="Hide Other" Visibility="Collapsed" Click="Show_Click"/>
	</CommandBar.SecondaryCommands>
	<AppBarButton Name="Show" Icon="Accept" Label="Show Other" Click="Show_Click"/>
</CommandBar>
The CommandBar is a Control that allows for AppBarButton that will be displayed, these are main feature of Universal Windows Platform Applications and can make use of a standard Icon to make your Applications fit in with others on Windows 10
Step 8
From the Menu choose View and then Code

Step 9
Once in the Code View, below the end of public MainPage() { … } the following Code should be entered:
private void Show_Click(object sender, RoutedEventArgs e)
{
	if (Hide.Visibility.Equals(Visibility.Collapsed))
	{
		Hide.Visibility = Visibility.Visible;
	}
	else
	{
		Hide.Visibility = Visibility.Collapsed;
	}
}
The Show_Click is an Event that will be triggered when Hide Other or Show Other is Clicked. It checks if Hide has the Visibility is set to Visibility.Collapsed and will set the Visibility of Hide to Visibility.Visible otherwise it sets it to Visibility.Collapsed
Step 10
That completes the Universal Windows Platform Application so Save the Project then in Visual Studio select the Local Machine to run the Application

Step 11
Once the Application has started running tap the Show Other button to show an option on the bottom when … is tapped and tap Hide Other to hide this option again

Step 12
To Exit the Application select the Close button in the top right of the Application
![]()


Thank you for your sharing, It’s easy to understand.
LikeLike